Montabi Movement Builds
Win fights by controlling tiles, range, and AP—not by trading Trainer HP for bad positions.
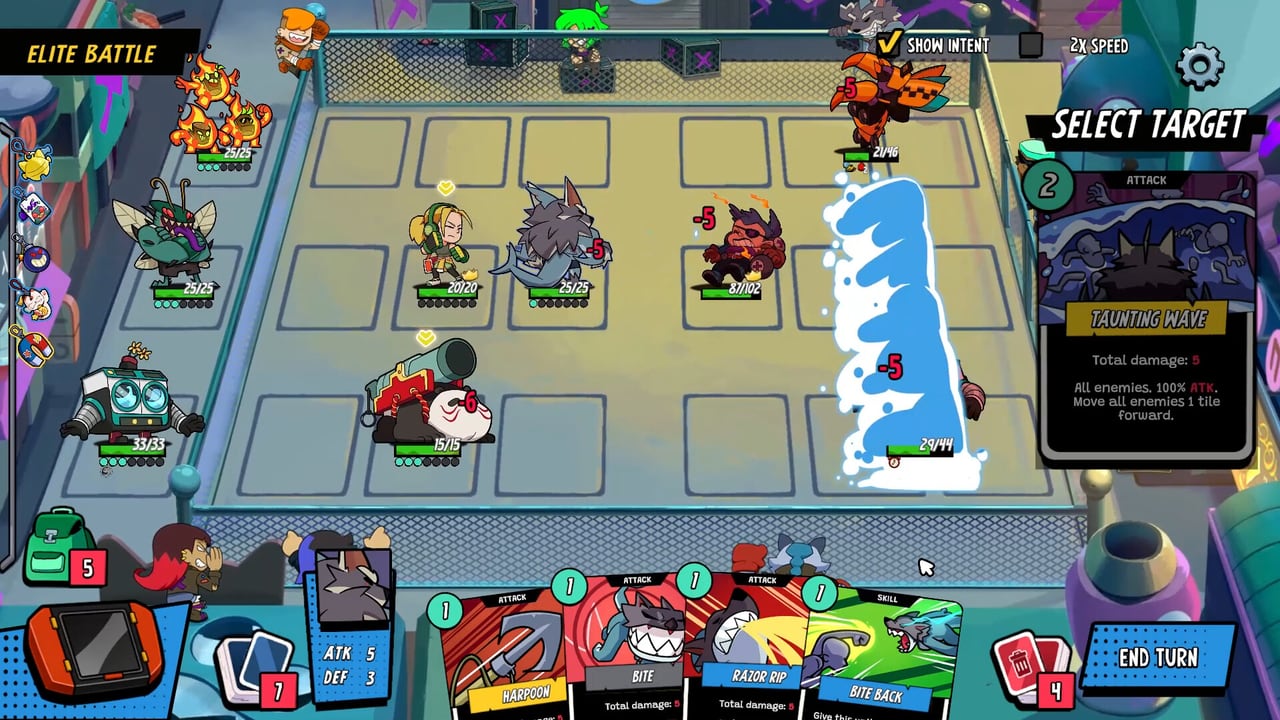
Montabi’s hook in a crowded roguelike deckbuilder space is tactical movement on a 3×3 grid. Physical attacks care about range, adjacency, and who occupies which tile. Movement builds treat the grid as the real resource: you spend action points to place the Trainer safely, slide enemies into hazards, open lanes for melee Montabi, and bank AP when the rules allow unused points to carry forward. This guide explains how to assemble movement comps, which items amplify positioning, and how movement coexists with status or team archetypes without splitting your gold.
If you have only played flat Slay-the-Spire-style combat, movement builds require a mindset shift—sometimes the best card play is zero damage but perfect tiles.
Grid rules that movement builds exploit
Each side fights on a 3×3 board. Montabi and enemies occupy tiles; many skills move units one or more spaces, swap positions, or pull targets toward the front. Trainers behave like kings in chess: if they die, the run ends, so movement builds prioritize Trainer safety even when a Montabi could deal extra damage from an aggressive tile.
AP economy matters simultaneously. Teams draw hands each turn and spend AP on cards. Movement builds often float one AP intentionally so banking rules reward patience—check current patch notes on the Guides Hub if banking text changes, but the skill expression remains: don’t spend the last point on a marginal hit if reposition saves the Trainer next turn.
Range surprises new players: a melee Montabi two tiles away may whiff while baseball supplies still chip. Movement builds close distance cheaply before spending finishers.
Core card types
Push and pull —relocate enemies off safe tiles or yank them onto mines and debuff zones.
Self-move —dash Montabi forward or retreat without provoking full-party shifts.
Swap or escort —protect the Trainer by placing a bulky Montabi between threats and your back row.
Zone setup —mines and persistent tiles reward enemies who chase you—pair with supplies when decks lack native placement skills.
When thinning at the Cafe, delete cards that only deal flat damage without repositioning unless they are stickered finishers.
Trainer synergies
Fighter trainers naturally reward movement tempo—adjacent attacks and front-line pressure love cheap reposition cards. Student trainers use movement to buy time until draw engines online, then snap into kill range in one turn. Chef trainers move defensively, kiting while food and charms recover HP.
Read Best teams for full comp lists; this page focuses on tile tactics those comps share.
Items that multiply movement value
Stickards —extra AP on play turns low-impact movement skills into engines; Innate on a key reposition card fixes bad opening hands.
Charms —passives that trigger on movement, adjacency, or first strike after repositioning; Gotcharm rolls can define movement runs when stores are dry—see Charms.
Equipment —front-line Montabi wear gear that rewards being adjacent to enemies or reduces damage while blocking; Trainers wear survival gear while learning routes.
Supplies —mines and baseballs cover turns when hands lack movement; stock before elites that punish static teams.
Shop routing: Items Hub for convenience store, Stickards, and Cafe timing.
Sample turn sequences
Open —move Trainer one tile back, advance tank Montabi to threaten adjacency, place mine or debuff if available.
Mid —pull priority target onto mine or into melee range of carry; spend supply if hand is dead.
Close —bank AP if next turn’s finisher needs two movement points; do not leave Trainer on a diagonal threat line against boss jump skills.
Adjust when enemies are ranged-heavy—movement builds lose if you chase forever without Stickard damage or status tick.
Movement plus status
Status builds love movement because Bleed, Sour, and Spicy pay off over turns while you control space. Apply debuffs, then kite with push tools while supplies block advances. Stickards that add Sour on strike make repositioning attacks doubly valuable.
Avoid splitting purchases: if you commit to movement-status hybrid, buy one charm axis and one sticker axis, not three partial themes.
Capture and tier considerations
Use the Tier list to find Montabi whose kits include native push-pull—not every species belongs in a movement run. Biscuit captures that add displacement replace flat damage carries mid-act.
Common mistakes
Overcommitting the Trainer forward for one kill. Thinning movement cards while keeping redundant strikes. Ignoring supplies when Stickards ate your gold. Fighting on bad tiles because AP banking felt wasteful—sometimes banking saves more HP than a weak attack.
Practice path for new players
Run Fighter with one displacement Montabi, one mine supply type, and a single Innate movement Stickard. Learn Trainer safety before optimizing DPS. Graduate to Builds Hub hybrids when clears feel consistent.
Related links
- Builds Hub —overview and team axes
- Status builds —debuff stacking with kiting
- Supplies & Stickards —mines and AP stickers
- Trainers —passive differences
- Getting Started —AP and hand basics
Frequently Asked Questions
Quick answers to the most common Montabi questions.
Why is movement important in Montabi?
Many attacks care about range and tile placement on a 3×3 grid. Repositioning avoids Trainer knockouts and sets up melee finishers efficiently.
Do unused action points carry over?
Montabi combat allows banking unused AP in many situations—movement builds exploit that by repositioning instead of forcing weak attacks.
Which Stickards help movement builds most?
Extra AP on play and Innate stickers on key reposition cards are the most consistent picks, followed by damage riders once your tiles are stable.
Can movement builds win boss fights?
Yes, when you combine displacement, supplies for control, and stickered finishers. Pure movement without damage or status scaling falls off on high-HP bosses.